.
Advance warning: It is always flattering to be given the opportunity to prattle on endlessly about something, and to convince yourself that you know what you are talking about. This is a guest post about guitars, (mainly) bass guitars, and upright basses. (Especially) if you are not aware of any distinction between those instruments, and do not wish to become so aware, it might prove very tedious reading.
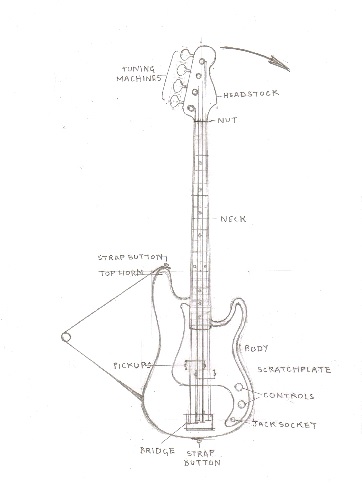
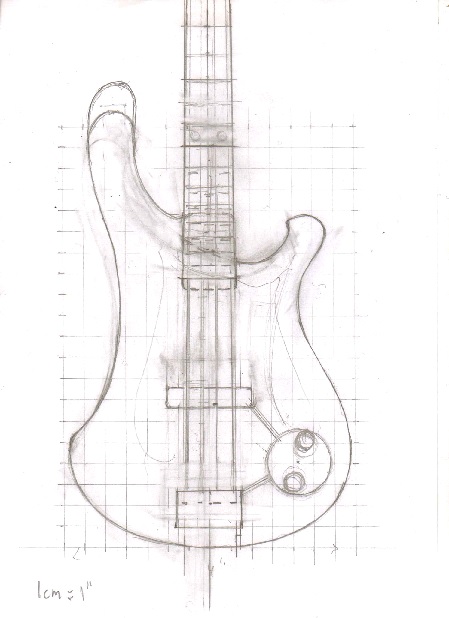
..Still with us? Depending on your familiarity with the bass guitar and its constituent parts, you may or may not need to refer to this diagram to follow what follows:
.
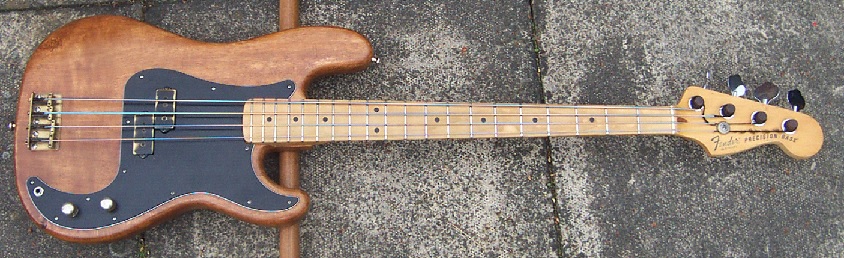
I bought my first bass guitar in 1981, I think. It was a cheap Japanese copy of the Fender Precision Bass, which meant back then, and probably still does – that you could buy three of them for what a Fender cost. In case you don’t know, the Fender Precision bass is the industry standard. Leo Fender marketed pretty much the first bass guitar over sixty years ago, in 1951, and six years later he refined it into a classic design that is still manufactured in huge numbers even today. Indeed, in the years following its introduction, ‘Fender Bass’ was sometimes used by musicians as a generic term for any bass guitar, whether made by Fender or not, simply because, more than nine times out of ten, if someone played an electric bass guitar, it was one made by Fender.
.

.
(Actually, the only genuine Fender part of the bass in that picture is the neck and tuning machines, but the remaining parts are all functional and dimensional facsimiles of the parts that make up an 100% genuine Fender Precision bass.)
Before the advent of the bass guitar, the bassist was an acoustic upright bassist, which implies a special set of skills, and supply of special skills with fair remuneration is invariably exceeded by demand. For this reason, Fender allegedly deliberately made the bass guitar as an instrument which a guitarist could switch to without too much discomfort or acclimatisation. The ‘mensure’ or ‘scale-length’- the vibrating length of the open strings – on an upright bass was about forty-two inches. A guitar has a mensure of about twenty-five inches. Fender split the difference and designed his new-fangled bass guitar with a mensure of thirty-four inches. An upright bass has a ‘fingerboard’ on which notes can be stopped by the left hand, but it doesn’t have frets. A guitar has a ‘fretboard’, with frets. Fender equipped the bass guitar with a guitar-style ‘fretboard’. This was the reason for the name; ‘Precision Bass’, the frets enabling the notes to be stopped by the left hand precisely.
Fig.1 Electic guitar, Fender bass, and upright bass to scale. Arrowed lines on the far left indicate the vibrating length of the open strings, or ‘mensure’.
.

.
The Fender bass made the bass ‘easy’… Guitarist-easy, since a significant part of the upright bassist’s skill-set – the ability to intonate all notes precisely on a fingerboard without frets – had just become negotiable. Also, the Fender bass was, and is, an ‘electric’ bass, so another part of the upright bassist’s skill-set – the ability to produce acoustic volume – had also just become negotiable. Pizzicato technique on the upright bass employs the fingers of the right hand, but the design of the Fender bass implied a default right hand technique of using either a plectrum, or the thumb, just as a steel-string guitarist would.
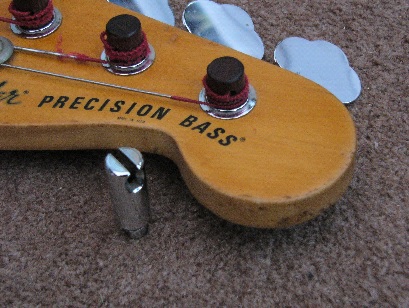
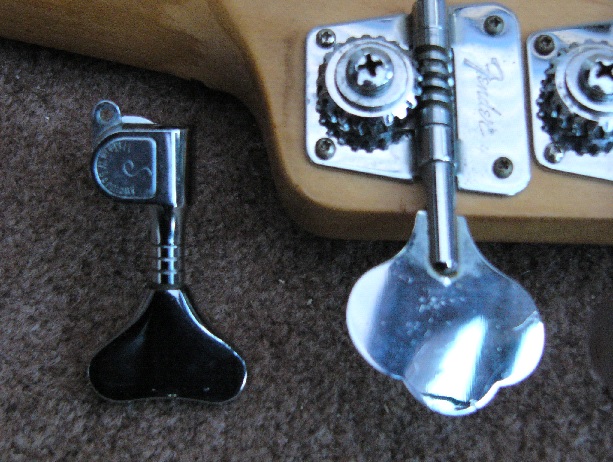
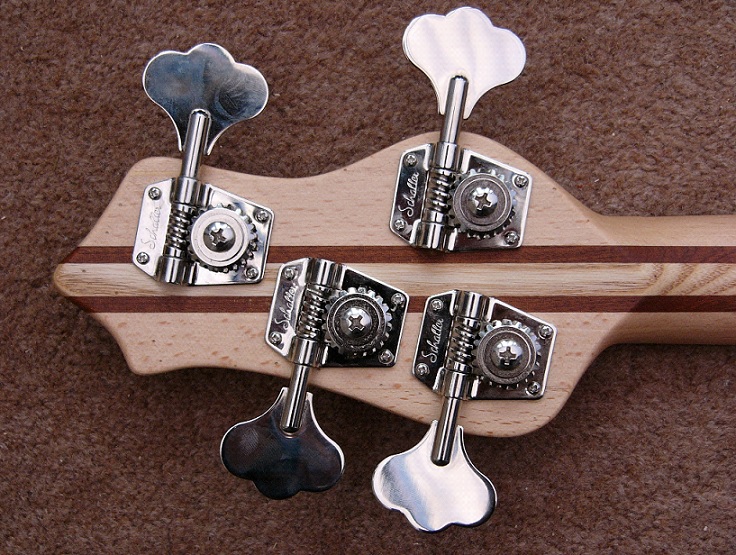
Obviously, the early Fender basses had to make use of ‘hardware’ designed either for upright bass or for guitar. Bass strings are thick compared to guitar strings, and have more tension, so there was no hope of using guitar tuning machines – the tension would have destroyed them. So the tuning machines had to be upright bass tuning machines. To emphasize this point, the photo below shows a guitar tuning machine, next to the post from a bass guitar tuning machine, which is about the same diameter as the one on the upright bass tuning machine behind them.
.

.
… And now we’re getting to the dilemma which is more or less the subject of this post…
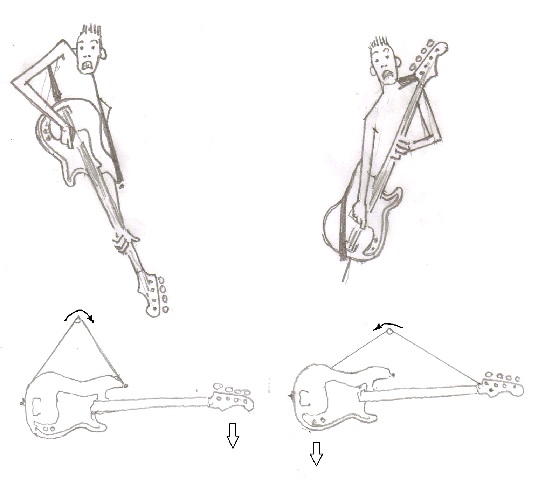
Fig. 2. The ‘neck-dive’ test. Bass supported on strap, hanging from a drumstick.
.

.
The photo near the top of this post (purple background) shows a Fender bass oriented quite close to its ideal playing angle. This angle might vary from player to player, but the main point is that whatever the angle, if the player removes both hands and arms from the bass, it should ideally remain at the ideal playing angle. Anyone with a rudimentary grasp of physics will readily appreciate from fig. 2, above, that four heavy bass tuning machines set in a row at the extremity of the neck militate against achieving this. This tendency for the unsupported bass to end up with its headstock on the floor is known colloquially as ‘neck-dive’. Almost all bass guitars have this tendency to some degree. To be fair to Fender, their basses are by no means the worst ‘offenders’. (sorry!)
Players intuitively compensate for this by resting the right forearm on the body of the bass and/or holding the neck up with the left hand, which is a far from ideal situation. You are already trying to play some music, which almost by definition entails asking your hands/fingers to do some complex manoeuvres which are far from instinctive. Why add to their workload by asking them to hold the instrument in position at the same time?
The source of the problem is the relatively long neck and heavy tuners on the electric bass guitar, compared to the electric guitar. I don’t know if the concept of neck-dive had any currency in the guitar world of the early ’50s? I guess if it was noticed at all on the new bass guitar, it was seen as an acceptable trade-off against its other advantages over the upright bass, such as portability, and unhindered access to twenty frets, which was pretty unprecedented, even on guitar, let alone bass.
Perhaps in tacit acknowledgement of this neck diving tendency, Fender basses were fitted with an optional strap button on the back of the headstock, so the shoulder strap could be run effectively from one end of the instrument to the other. That is a far from ideal place for it, however, because, besides stressing the neck itself, while it cures ‘neck dive’ with overkill, it introduces the exactly opposite problem of what you might call ‘bridge dive’:
.
.
What is happening is that the strap is moving across the player’s shoulder, in one direction or the other, and indeed some players have been known to use all kinds of strategies and weird harnesses to prevent or minimise this movement.
When you are young you don’t much care about this. You just want an instrument that resembles the one played by your idols, as closely as possible. That first Japanese Precision copy of mine came with price-point tuning machines which were fairly lightweight. The first modification I made to that bass was to replace them with big heavy tuning machines with half-inch diameter posts like you’d find on a real Fender Precision. And to do that properly on that particular bass it was necessary to saw off the angled part of the headstock which housed the tuner-post holes for the original tuners, and replace it with fresh wood. Something like this:
Fig. 3. Shaded part above sawcut represents original shape of headstock and size of tuner-post holes. This was sawn off and replaced with a larger piece of wood, (Solid outline above sawcut) and new larger diameter tuner-post holes bored.
.

.
At that time I had never heard of ‘neck-dive’, and if somebody had told me about it it wouldn’t have made any difference to me. That was well over thirty years ago, and now I can’t even remember if the bass ‘neck-dived’, or not. Whatever its propensity to do so before my modification, it can only have been enhanced after it.
Note also that the neck-dive phenomenon is mainly a function of geometry, and is barely affected by the weight of the body-wood. A Fender Precision might weigh somewhere between eight and ten pounds or more. 1970s ones are especially prone to be on the heavy side, so I’ve heard, but the tendency to neck-dive is still there. If you doubt this, try the experiment of clamping a four-inch G-clamp near the bridge, and perform the neck-dive test again. My clamp weighs just over one and a half pounds, and just succeeds in curing the condition, but bear in mind that in this case, all this extra imposed weight is at the very extremity of the body of the bass, or in fact beyond it, which is analogous to having a very heavy body wood indeed – heavier than most of us mortals would wish to suspend from one shoulder for an hour whilst trying to play music. Furthermore, the eight and a quarter pound bass I tried this experiment on has already been modified to minimise neck-dive, with the chromed brass tuning machine posts replaced with hardwood replicas, and the strap-button on the top horn extended out about an inch towards the headstock:
.

.
So, if we set about redesigning the traditionally headstocked 34″ scale bass guitar to cure neck-dive without additional counterweight, these are the available strategies: Lengthen the top horn towards the headstock, and minimise the weight of the neck, and especially the headstock/tuning machines, projecting beyond the extremity of that top horn.
Well… these days there are lightweight tuning machines available on the market – either extraordinarily expensive ones that mimic the style of the originals but using weight-saving materials, or just smaller machines, usually with enclosed gears – but to my mind a bass should have big fat tuning machines with open gears, both functionally and aesthetically. The photo below shows a late ’80s Schaller ‘mini’ bass tuning machine next to a late ’70s Fender bass tuning machine, which, despite its branding, was also manufactured by Schaller. Most basses made today that are not Fenders, or Fender clones, use these smaller machines. Especially with the move towards twenty-four fret necks, and later to five-string (and beyond) basses, they are more or less obligatory to maintain some semblance of balance in the instrument.
.
.
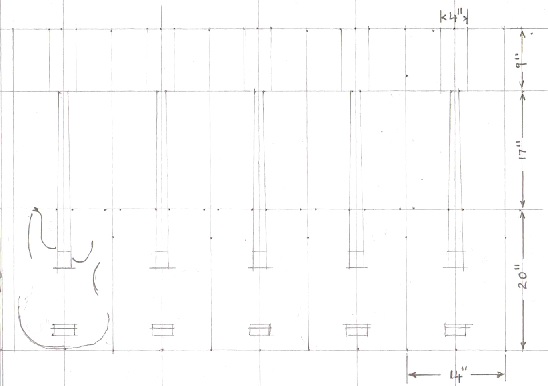
So for those bass players with an affection for those big old open gear tuning machines, but desiring a balanced instrument which is not too heavy, the only thing to do is to extend the top horn of the body. If you look at the Fender Precision you will notice that the strap button on the top horn is just about in line with the twelfth fret on the neck, behind those two dots on the fretboard. That twelfth fret is at the exact mid-point of the open string, so on a 34″ scale instrument, it should be seventeen inches from the nut.
In the fifty or more years of bass guitars designed since the Fender Precision, there have been designs with a shorter top horn, but for some reason, none with a significantly longer one. On those designs that appear to have a longer top horn, it is usually a sort of optical illusion brought about by the presence of a twenty-four fret neck, with its associated body cutaways to reach the top frets, but the extremity of the horn is still at the twelfth fret. I cannot think of any reason why that particular strap button location should be sacrosanct, beyond the fact that, after fifty years, it is extremely familiar. If there is a reason, there is only one way to find out about it.
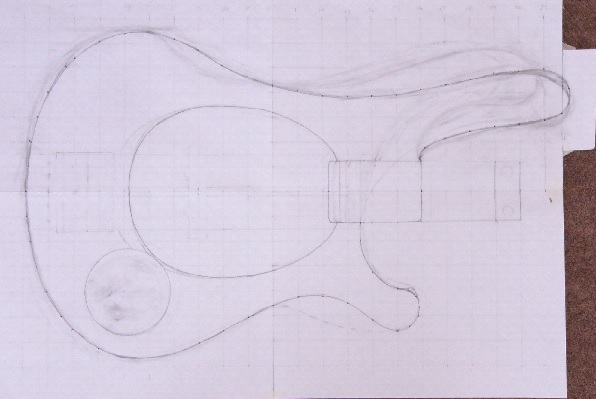
So, within these long-established parameters, anyone can design a 34″ scale Bass Guitar. Here is a blank that you can print off and have a go yourself:
.

.
Right there, there are five opportunities to design a bass guitar. Apart from a few deliberately wacky designs, just about any instrument from the past fifty years will fit in those boxes, or nearly. I’ll show you how to do it. Start by knocking off some useless corners, and provide yourself with a ‘cutaway’ so that the player can get his left hand up to the highest frets:
.

.
Give the player somewhere to fit his right thigh when seated:
.

.
Put the strap button somewhere on that line and give yourself a top horn that it can be screwed into:
.
.
Join up the bits you’ve already done:
.

.
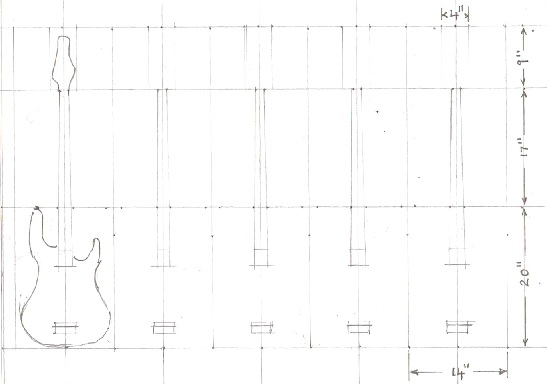
Finally, give yourself a headstock. Job done!
.
.
Well.. there’s a bit more to it than that, obviously, but not much more. Send your design off to the production dept., and let them sort out the details. But be sure to specify those little lightweight tuning machines, so that any balance problems inherent in your design are minimised.
Alternatively… let’s literally think outside the box, or at least, let’s just extend that twenty inch box about three inches towards the headstock, leaving our twelfth fret exactly where it was, so we can maybe use some of those proper fat bass tuning machines:
.
.
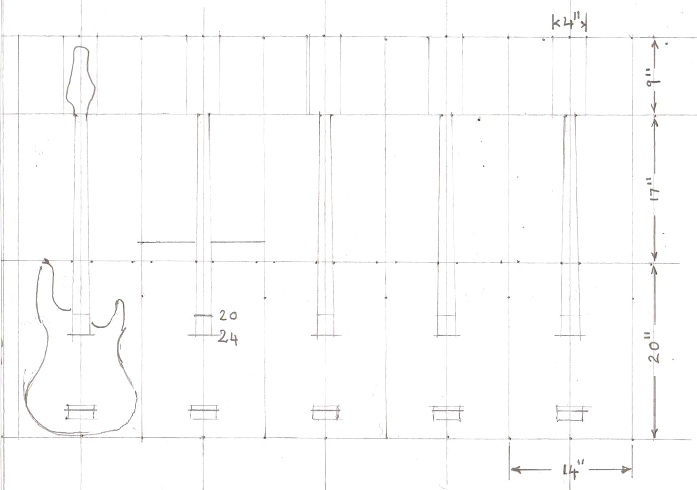
Notice that I’ve also marked the position of the 20th fret- the highest fret on a Fender Precision – and the 24th fret, the ‘two octave’ fret up to which many later bass necks extend. 24 frets sounds logical. Why stop at twenty? Well… there is a logic behind twenty frets as well, which I won’t go into here. Suffice to say that personally, I don’t need those four extra frets. Also the top horn on my bass is going to be plenty long as it is.
Let me just say that this started off as a purely two-dimensional exercise. I don’t build many instruments. Sometimes I amuse myself by plotting them out on paper. Sometimes they get built. Often they do not. As far as electric bass guitar goes, I’ve basically been playing the same one since the 1980s. I bought that Fender neck in the first photo new in 1983, and made a body for it. By that time Fender Precisions were going out of style a bit, and the latest object of desire among bassists was the Musicman Stingray. The thing was that the Fender, and every individual part that comprised it, already had a long history of being copied, and marketed. Replacement bridges, pickups, scratchplates, and tuning machines were freely available. For the Musicman, first introduced in 1975, nothing was available. So in late 1983(?) I put together this, which is basically a Precision Bass with a home-made Stingray-esque scratchplate and control plate. A friend soldered up the electric bits for me. (Thanks Strumma- I still owe you some beers):
.

.
Looking at it now, I can see that the body shape is not strictly Precision – it is a little too bulbous. It was probably copied from my Japanese Precision copy, or perhaps I just did my own ‘take’ on the thing? I can’t remember. A little later, in 1984, I made an interchangeable fretless neck for it. I didn’t do a very good job of levelling the fingerboard, which is why there’s a bit of masking tape on it:
.

.
I gave away that fretless neck to a friend a year later, along with a body blank that was slightly messed up from trying to cut it out with an electric jigsaw. Since then I’ve done instrument building strictly with hand tools – no electricity – except for lighting, (and soldering, which I eventually got to grips with).
I used that bass, with the fretted Fender neck, for the next ten years or so. Over that time I messed around with the body a bit, chopping a few bits off here and there. Some time in the mid ’90s I went a bit too far, and noticed the neck-dive, although I didn’t have that term for it, back then. At that time, I thought that the balance of the bass could be restored by building a new body out of heavier wood, so that’s what I did. I got a nice piece of heavy Maple and ended up with this:
.

.
It was a bit disappointing. With heavy wood, a massive bridge, a brass control plate replacing the old aluminium one, I just ended up with a heavy bass that didn’t balance much better than before. So it was around that time that I started to think a bit more about this balance thing. (I also removed the bridge-position pickup, because I hardly used it. At some point I had spray-painted the pickup covers black).
Some time around 2005(?) I stained the body a sort of transparent black, (no photo) and re-installed a more sympathetic bridge and scratchplate. A few years later I gave it a good going over, took a bit of thickness off the body, and refinished it in natural wood:
.

.
And then for some reason, some time around 2010(?), I painted it red. I think it might have been something to do with having discovered the internet, which, as we all know, is fatal. (And that below is the first digital photo in this series- i.e. taken with a digital camera and uploaded via USB, rather than being a ‘real’ photo or negative that’s been scanned):
.

.
Yeah.. the internet… where, whatever you do, you can find thousands of people doing it better, more effectively, with more experience, and of course, spending a lot more money than you ever could. But you can learn a lot. I learned about ‘neck dive’, and eight-pound Precision Basses and such, among other things, which accounts for what I did to this bass next. Which was to build yet another body for it, this time out of lightweight Poplar, which I stained a sort of mahogany colour. And I put the tuner-posts in storage, replacing them with hardwood copies. In this photo the bass is ‘balanced’ on the centre of that piece of wood running top to bottom at the seventeenth fret. That is more or less where the balance point was before, with the heavy maple body and chromed brass tuner posts, but the whole bass is now over a pound lighter than it was:
.
.
Having become sensitised to this weight/balance issue, it continues to play on your mind. You can’t just revert to the good old days when you weren’t even aware that you had a problem. I guess for some people, such sensitisation leads inexorably to throwing money at the problem. For me, with not so much money, but some spare time and a small stash of timber and hand tools, it leads initially to paper and pencil.
When I started doodling, Lemmy from Motorhead had just died, and images of Lemmy with his Rickenbacker bass were everywhere, so the first drawing I worked up started out as a Rickenbacker body outline. At that point I didn’t know whether the bass would be a ‘neck-through’, like a Rickenbacker, or a ‘bolt-on’, like a Fender. Anyway, I started with that outline, sat back and stared at it for a while, thinking, and, if you do that for a while, eventually, a bit of line will look wrong, so you get up, rub it out, and re-draw it. And you keep doing that. The rubber gets black, the paper gets grey, the lines get heavier to compensate. Eventually, no amount of staring and thinking will yield further ‘improvements’, and the process is finished. This is my first drawing:
.
.
But I gave up on that drawing in the end. I found myself asking: “Why does that top horn have to curve like that?” In woodwork, I’m always wary of creating areas of ‘short grain’, which is fragile, especially in load-bearing areas. So I started again, and came up with this. The dotted line is the Fender Precision outline, for comparison:
.

.
And then I worked that up into a full-size drawing, and refined it a bit more:
.
.
And you begin to understand one reason why bass guitars are not built like this- because the top horn starts to resemble a bit of male anatomy. Imagine Mr. Fender wrestling with this problem, back in the 1950s… the early 1950s, for f…s sake… before Elvis. Back then, his new-fangled bass guitar was going to be battling for acceptance and laughed at anyhow, no need to add fuel to the fire by having it hanging, perfectly balanced, from a dildo.
So there it was, more or less, in two dimensions. Could I justify actually building the thing? The drawing sat blutacked to my wall for a few weeks while I experimented playing the Precision bass with the end of the strap tied around the neck at the ninth fret with a bit of old inner-tube. I half-heartedly pulled a few planks of wood out of storage, and mentally talked myself into – and out of – investing in a new set of tuning machines and bridge. In the end, my curiosity got the better of me, so I bought a little bottle of Titebond Original wood glue and set to work with a handsaw.
I don’t have any photos of the construction process. It’s really just methodical. Mainly it is sharpening blades, and improvising ways to hold funny-shaped bits of wood (and a few bits of metal) in position while you work on them or attempt to glue them together. A bench with a vice can help tremendously. If you can get that much together, then the work pretty much does itself. And towards the end, it is a lot of sanding – as much sanding as you can bear. One of those Victorian cats, probably John Ruskin or William Morris, once said: “There is no reason to be proud of anything which can be achieved with patience and sandpaper”, and I completely agree, even though sandpaper is arguably one of the few technologies that have been developed to the point where they are more effective now than they were back then.
Tools used: Pencil, ruler, compasses, square, handsaw, coping saw, hand plane, spoke shaves, mallet, chisels, knives, cabinet scraper, brace and bits, hand drill and bits, junior hacksaw, files, dividers, hammer, centre-punch, screwdrivers, tinsnips, G-clamps.
.


.
It is obvious from the front and rear views above that the body is laminated. There is no particular reason for that, except that I was after a lightweight body, both for its own sake and to test the balance of my geometry to the maximum, and I happened to have a plank of clear(ish) Pine just over an inch thick, and a plank of Tulipwood about three quarters of an inch thick, so I glued them together. That Tulipwood was once part of an old piano case. That’s the best place to find it. It is always covered with veneer, which I plane off. This particular piece is almost quarter-sawn heartwood with no white sapwood, and beautifully straight-grained, but, although technically a ‘hardwood’, it is soft and easily scarred – about as soft and easily scarred as the Pine on the back.
I have always wanted to combine that Tulipwood with some Padouk. I still have several fretboard-sized boards of Padouk which I rescued from a skip in Manchester back in the ’80s. The colour of Tulip heartwood is quite a vivid green, and Padouk is an equally vivid red, so the contrast is striking. The photo below shows this contrast to maximum effect. That is the natural colour of those timbers – neither of them have been artificially stained or otherwise enhanced, unless some computer programme did it without my permission? The padouk, especially, will oxidise to a darker shade over time:
.

.
This photo shows the same DiMarzio ‘J’ model pickup which once long ago occupied the ‘bridge position’ on my Precision, upthread. Being a ‘bridge position’ pickup, it is slightly wider, with slightly wider pole-piece spacing, than a ‘neck position’ ‘J’ model, which is why the strings don’t pass directly over the spaces between the pole-pieces. On this bass, it is in the same ‘spot’ that a Precision pickup traditionally occupies. The scratchplate surrounding it was going to be black plastic, but I’m too stingy to pay the crazy price asked for the raw material. I did find some sheets of plastic locally, and had a go at laminating them. It was a miserable failure. So I returned to the material I do know how to laminate. I glued this veneer to a bit of 1.5mm Birch 3-ply, and glued another ‘balancing’ veneer on the back. Out of my little collection of veneers – the remains of somebody’s marquetry supplies – this was one of the few sheets that was large enough to be used. I don’t know what species it is. Those brass screws are, like the Tulipwood they are screwed into, part of an old piano:
.

.
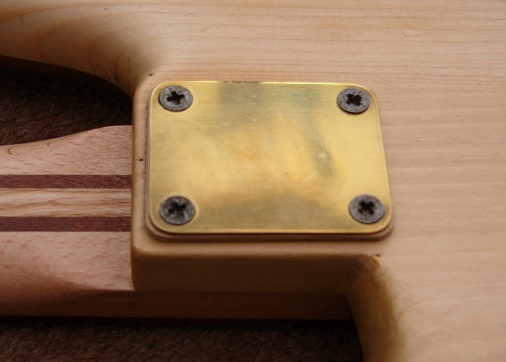
Partly from suitable timber availability constraints, I opted for a removable ‘bolt on’ neck design rather than an integral ‘neck-through’ design in the end. I still favour this Fender-dimensioned neck-pocket and attachment method, pretty much abandoned by both big and small-time bass-makers in favour of individual metal screw-socket ‘inserts’ and sculpted heels. The square heel makes it easy to tilt the neck with shims if you need to, and the anchor-plate is not going to split any wood, especially where there is ‘short grain’ between the heel and the screw holes.
There is a couple of 1.5mm Birch 3-ply spacers under the home-made anchor-plate, because I am too stingy to pay the exorbitant price asked for four chrome-plated screws of exactly the right length. And while we are there, why does the thread go all the way up to the head of the screws these days? If I am asked to pay through the nose for specialised screws, I want ones that look like they were designed for the specialised task:
.
.
The radiused end of the Fender-style neck-pocket is a PITA to do with basic handtools. One of the few construction chores during which you do sometimes wish you had an electric router, or at least a small collection of internally ground gouges:
.
.
This circular control cavity, unlike the more usual crescent-shaped cavity, also minimises short grain around the edge of the instrument. It is not usually a ‘load-bearing area’, unless somebody drops the instrument and that area contacts a hard surface, with force. I tend not to use tone and volume controls much so I didn’t bother installing pots. There are two centres punched in the control plate ready for when I change my mind. The switch is a series/parallel switch for the pickup, which is actually a pair of pickups, with four wires coming out of it so you can do that kind of thing. The switch is wired directly to the jack socket:
.

.
The gubbins. Ever vigilant for a recycling opportunity, or, if you like, a futile gesture towards the bourgeois fantasy of a sustainable future – I cunningly designed my control cavity to accept the bottom end of an ubiquitous tin can, so I don’t have to mess around too much with tin-foil or expensive electric-shielding paint. But in between the strings you can probably see the rough edges of a sheet of tin-foil peeping out from underneath the scratchplate:
.

.
While that Gotoh bridge you can see the corner of, above, is the most massive bridge I am currently inclined to accommodate, in the photo below you can see the least massive set of tuning machines I am currently inclined to accommodate: Schaller BM. The mechanical bits are dimensionally identical to the Fender-pattern ones upthread, but on a slightly smaller plate, and with slightly smaller ‘ears’. I’d rather spend money here than on chrome-plated neck-anchor screws, any day. The neck is Ash in the middle, some unidentified hard tropical wood each side of it, and Beech. Laminating made it possible to ‘build’ a perfectly formed truss-rod channel with planed sides, rather than having to rout it, or plough it out of the solid wood:
.
.
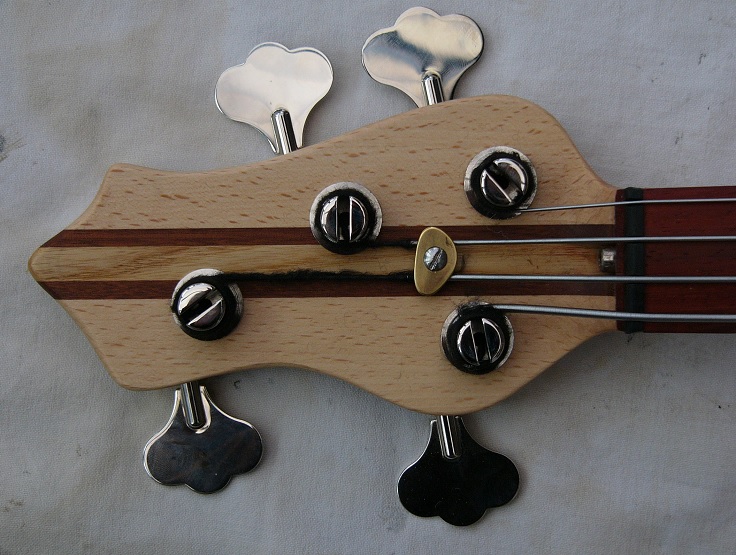
Front view. To help balance the instrument I wanted to get as much of the mass of the tuning machines as possible as close to the nut as possible, while also hoping to get all four strings exiting the nut in a straight line. Underneath the nut you can just see the ‘bullet-nut’ adjustment on the end of the truss-rod. The truss-rod channel, under the length of the fingerboard, is not ‘blind’, so theoretically the entire truss-rod can be withdrawn if necessary, with a judicial application of force at one end or the other. The string-tree was fabricated using one of the corners I cut off while making that circular control-plate. This time I even found a chrome-plated screw to hold it down to the headstock:
.
.
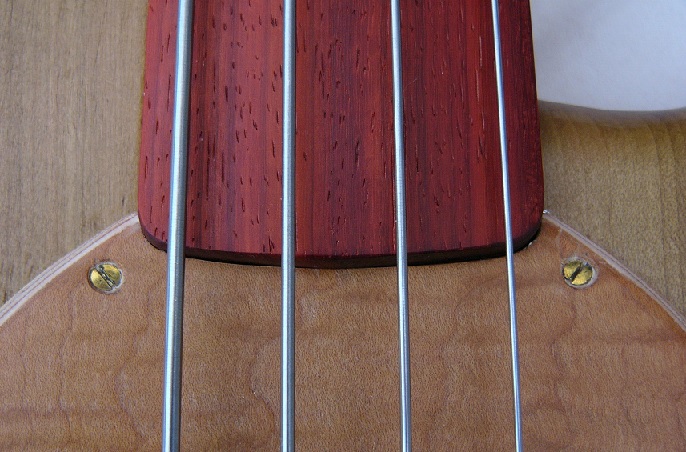
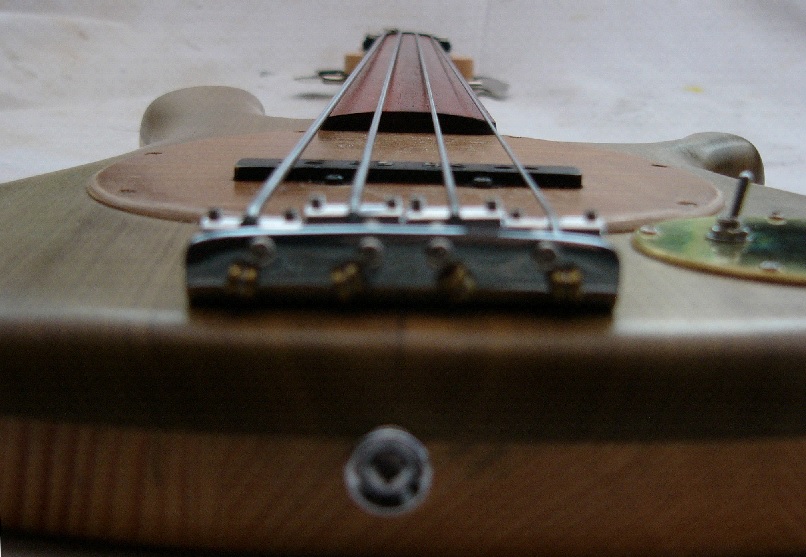
Side view. A fairly dramatic string break-angle over the nut by electric bass standards. Winding the ‘E’ and ‘G’ strings onto the tuning machines requires a bit of care. The nut is not glued yet – it sits on an L-shaped cut-out in the fingerboard end, and is held in place by the string tension:
.

.
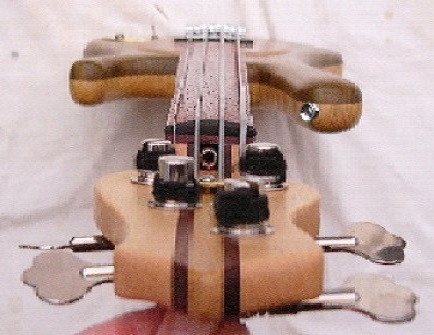
The strap button is slightly off-centre due entirely to error. The dark line vaguely visible above it is the centre-line of the instrument. Strap button aside, I took great pains to honour that centre-line. You can be the judge of how far I succeeded. I haven’t measured the radius of the fingerboard. It was produced by instinct alone. I believe 9.5 inches is the usual Fender standard, with earlier ones sometimes a tighter radius of 7.5 inches? I would estimate this one as tighter still- maybe around 6 inches:
.

.
So what’s the verdict? Left to its own devices my Precision Bass in its current configuration has a balance point right in the middle of its neck anchor-plate. The new bass, in its current configuration, has a balance point that coincides almost exactly with the heel, just at the ‘leading edge’ of the anchor-plate. Bear in mind, however, the following points:
1. The new bass still has its chromed brass tuning machine posts, which have been replaced with hardwood copies on the Precision Bass.
2. The playing area of the neck of the new bass has a front-to-back measurement which exceeds that of the Precision Bass by about 1/8th of an inch.
3. The neck of the new bass contains a Martin-style truss-rod consisting of a ‘U’ section of aluminium extrusion surrounding the steel bar of the truss-rod itself, whereas the Fender neck has just the steel bar. (Aluminium may be light, but it is heavier than wood).
4. In this ‘off the strap’ balance test, the top horn of the new bass, which extends to a point equal to the ninth fret, is an added liability compared to the Precision Bass top horn, which only extends to a point equal to the twelfth fret.
My point being that nothing has (yet) been done to provide the new bass with a lightweight neck. Quite the opposite. This Precision Bass weighs eight and a quarter pounds in its current configuration. The new bass weighs just under eight pounds in its current configuration.
.

.
On the strap, the new bass is less skittish than the Precision Bass, and the positions near the nut – i.e. the low notes – seem to be more accessible, close at hand, without as much corresponding inaccessibility of the positions above the horn – i.e. the high notes – as you’d expect. I’d never particularly noticed any inaccessibility of low notes on the Precision Bass before, until I returned to it after a period of playing the new bass exclusively… and I’ve been playing the Precision Bass for thirty-five years. The new bass does have an obliging tendency to stay at the playing angle. It’s quite a subtle edge the new bass has over the Precision in this respect, the way things stand. If the Precision still had its stock tuner-posts, that ‘subtle edge’ would become much less subtle. So, I feel somewhat vindicated by the fact that this new bass has a light body and a heavy neck – which on the face of it sounds like a perfect recipe for neck-dive – and yet is less prone to the condition than the Precision Bass. The fact that this particular bass is relatively body-light and neck-heavy by no means indicates that further basses built using this geometry need necessarily be so.
…. Or… bass players can cut clean through this Gordian knot by just getting themselves a Steinberger, or an Ashbory… or an upright bass.
Here is a sound file of the new bass. It is recorded direct into a 16-bit digital 4-track machine and then uploaded to the computer, where I EQ’d a bit of low frequency away and added a bit of digital delay for ambience. I’m a rhythm section bassist by temperament rather than a bass soloist, but you should be able to recognise the song.
Even with the best of intentions, existential nausea is impossible to sustain on a full-time basis, so we find ourselves subject to these episodes of compulsive activity, creation, and destruction. Here are some pictures of my other bass-related woodwork projects, roughly in chronological order:
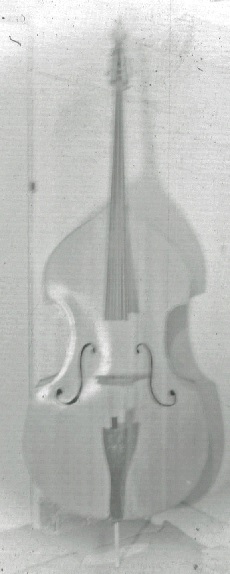
My first double bass. Built about 1989. Like everything else here, mainly from recycled wood. Flatback, plywood ribs, carved top. I had to replace the top after the instrument fell over on the way to a gig. (Some of these pictures are not great quality- they are bad negatives, badly scanned, and badly photoshopped).
.
.
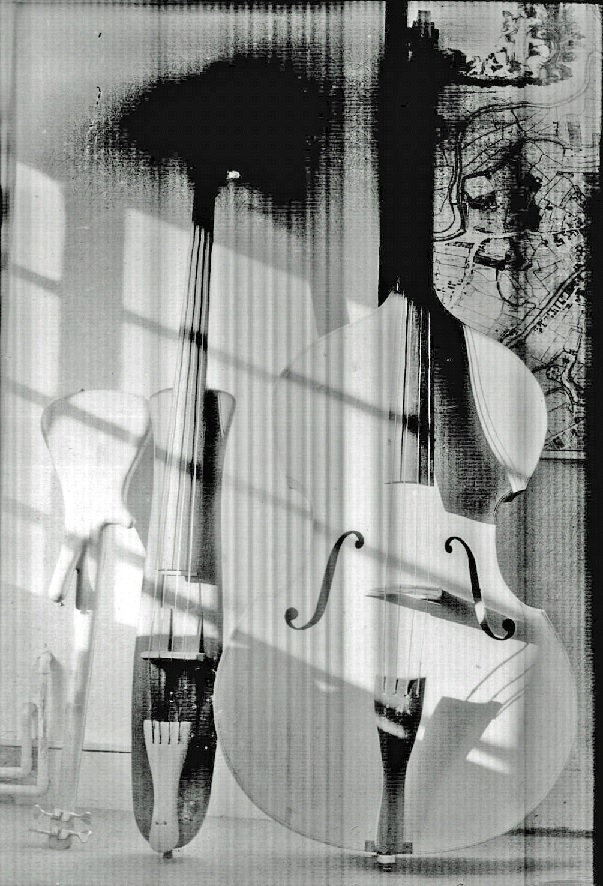
The photo below must date from the mid ’90s. Left: Rear view of an electric bass guitar with a very minimal headstock. It is upside down! Middle: Upright electric bass. Right: My second double bass – still ‘in the white’ – i.e. unvarnished. Flatback, solid wood ribs, carved top.
.
.
A better picture of the electric upright. Unless you use a bow and/or need a ‘mute’ upright bass for silent practice, these have nearly all the disadvantages of a double bass without the advantage – proper acoustic bass tone which can be heard/felt underneath an ensemble:
.

.
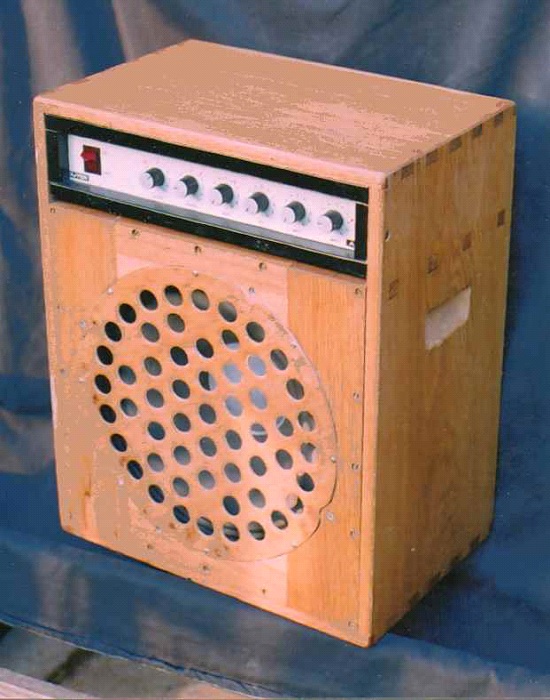
About 2002-3.. Bass combo built from solid Oak:
.
.
About 2005-6? Acoustic bass guitar. Mensure was about thirty inches iirc…
.

.
… which a few years later got re-modelled into this ‘pocket upright bass’, with a full 3/4 double bass mensure of around 41 inches. I wouldn’t even try to play either of these instruments in an ensemble without amplification:
.


.
2009? My third double bass – Cornerless, scrolless, flatback, solid ribs, carved top. Built after rejecting the ‘compact instrument’ experiments above. The smallest acoustic upright bass I consider practical- i.e. acoustically adequate. Measures about 65 inches overall from one end to the other, with a full 3/4 mensure of about 41 inches. (note: The 4/4 size double bass with a mensure of 43 inches or more is now seldom seen/used outside of classical orchestras):
.

.
Thanks for your time…
.
MD
